|
|
 subscribe
|
subscribe
|

6. User's Guide |
. . . . . . . . . . . . . . . . . . . . . . . . . . . . . . . . . . . . . . . . . . |
Internet TV with CU-SeeMe: Chapter 6 - CU-SeeMe User's Guide
6
CU-SeeMe User's Guide
After you read this chapter, you will know
Quick Start
CU-SeeMe is a self-contained application. There are few things to install and configure, yet many people have a difficult time running CU-SeeMe for the first time. Reasons for this include
TCP/IP connectivity is addressed in Chapter 5, Software. In general, Macintoshes require MacTCP or Open Transport as bedrock, SLIP or PPP as foundation, and a dialing program (for modem users) such as InterSLIP, MacSLIP, MacPPP, or InterPPP II as the dwelling. Windows 95 comes with TCP/IP and a modem dialer, Windows 3.11 requires a complete third-party software package (described below).
System software varies, based on the operating system, computer hardware, and camera. The manuals that come with your computer and camera have more details. In general, Macintoshes require QuickTime and associated plug-ins for video, plus a specific video digitizer plug-in for the specific camera or video capture board that you will be using.
The various combinations of computer systems, cameras, and digital video boards changes too rapidly for inclusion here. My web pages contain descriptions of working configurations, contributed by members of the CU-SeeMe user community.
Hardware required include a microphone (for audio-capable computers) and a camera or video-capture board. Hardware is discussed in Chapter 4, Hardware.
The CU-SeeMe discussion lists, which are described later in this chapter, are deluged with people who haven't read the bare-bones documentation that accompanies CU-SeeMe. You, of course, won't have this problem, since you have the extended documentation in your hands - and presumably you have already read up through this chapter.
Installing CU-SeeMe on Your System
Installing CU-SeeMe is a simple affair, consisting of moving the application to the desired location on your hard disk, obtaining and editing a configuration file, and in the case of Windows, making an icon in the Program Manager.
Macintosh
Once you have acquired the appropriate version of CU-SeeMe for your type of Macintosh - Motorola 680x0 or PowerPC processor - you need to decompress it. You can use Aladdin's StuffIt Expander, which is freeware available on the Info-Mac and UMich software archives. You will probably want to acquire a Nicknames list, described later in this chapter.
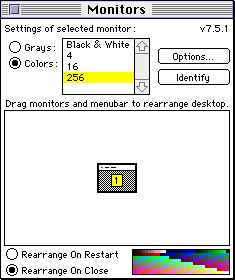
CU-SeeMe generates images that have at most 16 different shades of gray, so your monitor's display mode must be configured to show at least those 16 grays or 16 colors, also known as 4-bit video. If you monitor can display only 16 or 256 different grays or colors, your decision is easy. If your monitor can show thousands or millions of colors, you will have to play around with your video settings, because CU-SeeMe may have problems running in those modes.
Macintosh users use the Monitors control panel, shown in Figure 6.1. You will find more information in Appendix A, Troubleshooting.
On AV (audio-visual) Macintoshes, you may have to reduce the number of grays or colors chosen to 256 in order to digitize and send video. Additionally, you may need to turn off GeoPort devices and speech recognition and to set sound sampling parameters to a lower rate, such as 11.025 khz, with the Sound control panel to free up memory so that you can use CU-SeeMe's audio. Macintosh AV 840s default to 22 khz sound, so make sure you check.
Some Macintosh models have speakers that are connected to the motherboard by edge-pressure contacts, which effectively disconnect the speakers when they get dusty and dirty. They are easily cleaned.
Windows
Once you have acquired CU-SeeMe for Windows, you need to decompress it with the freeware PKZIP. You will probably want to acquire a Nicknames list, described later in this chapter.
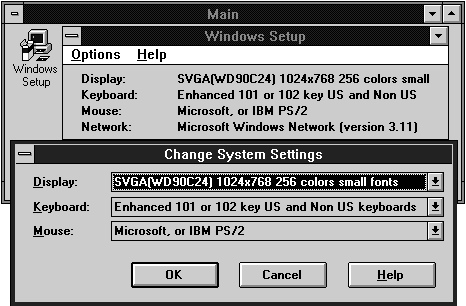
Windows users change their video output configurations through the Windows Setup control panel, shown in Figure 6.2.
CU-SeeMe requires that you are able to display at least 16 levels of grey (or color), and places no restriction upon the resolution you choose for your monitor.
Starting CU-SeeMe
The first time you launch CU-SeeMe you'll be required to provide some necessary configuration information. This information will be remembered for subsequent CU-SeeMe sessions. This section describes the Preferences dialog you'll encounter that first time, and whenever you choose to alter your CU-SeeMe setup (described later in this chapter).
Preferences
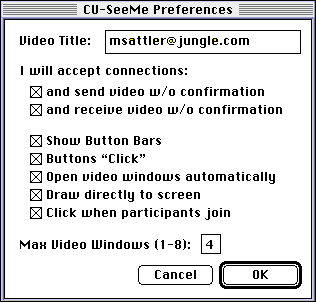
When you launch CU-SeeMe for the first time, the Preferences dialog box will appear, as shown in Figure 6.3. You can also change these values at a future time by selecting the Preferences item on the Edit menu. These values control how CU-SeeMe behaves and how others will see you. They are stored in a document in your Preferences folder in the System folder.
If you don't select this checkbox, because you prefer to not automatically accept connections, then you'll get a dialog box asking, Connection request from
Connecting
Now that CU-SeeMe is up and running on your system, you can reach out to others. There are two ways of doing this: manual addressing and Nickname files.
Manual Addressing
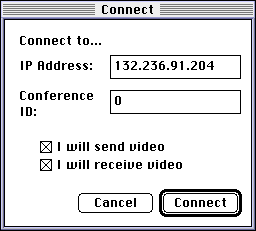
Choosing Connect... from the Conference menubar item causes the Connections dialog box to appear (see Figure 6.4). You'll be asked to provide the IP address of the computer whose reflector you wish to use and a conference ID, an agreed-upon number that identifies you as someone who should be allowed to participate. (Rarely do the public reflectors require a Conference ID other than zero.)
If you followed the instructions in the preceding paragraphs and all is well on the other side, you should see one of the following behaviors:
***Begin Note***
The Message of the Day (MOTD) is provided by the reflector operator. Useful MOTDs include the email address of the reflector operator, a location of a Web page that gives more information about the site, acceptable usage ("Set your transmission cap to 80"), and perhaps one or two upcoming events.
***End Note***
If you are the only one connected, you will see no windows until someone else connects. If other sending parties are connected - receive-only "lurkers" might be present - their video images will appear on your screen or you will be informed of their presence, depending on how you set up your automatic receive preferences. If the reflector does not immediately respond, the status will show CONNECTING. If the reflector times out - that is, doesn't respond after a set time - you will get a No response from message.
When you disconnect from a conference, CU-SeeMe ignores any audio or video from that IP address for one minute. This shouldn't cause any problems if you are skipping from reflector to reflector, but there is the possibility for confusion if you wind up connecting to the same machine within one minute. The delay is only one-way. If you disconnect from a conference, you can reconnect immediately, but that IP address cannot connect to you for a minute. Likewise, if you reconnect to the same reflector within a short time, you also won't be shown the Message of the Day notice screen.
Nicknames
As an alternative to repeatedly typing in IP addresses or hostnames, you can use Edit Nicknames from the Edit menu to set up Nicknames for IP addresses. Once you have done this, the Connect To menu item from the Connection menu will show the nicknames. You can also retrieve a file that contains a list of reflectors world-wide, known as a Nicknames List, from http://www.jungle.com/CU-SeeMe/.
Macintosh CU-SeeMe users should make two copies of the Nicknames List. Rename one copy CU-SeeMe Nicknames and move it to the Preferences folder. The Connect To menubar item will show all the nicknames that you have set up.
Consider the Nickname file shown in Figure 6.5. It contains site and usage information that has been added. Because CU-SeeMe for the Macintosh strips out these comments, the remaining copy is for you to place in your CU-SeeMe folder, should you need to contact the person running the reflector, to find out the maximum signal that the reflector will accept without kicking you off, to find out the address of that reflector's Web pages, and so on. (Reducing the number of colors to 256 or fewer on some machines greatly speeds the scrolling rate when you are searching the Nicknames list.)
Windows CU-SeeMe users must do some cutting and pasting, because the Windows version doesn't accept the same format as the Macintosh version of CU-SeeMe. Edit your cusEEME.INI file, found in the Windows directory, and add the textual hostnames - or the IP address if you really don't like being able to tell one reflector from another - to the MRU List section. CU-SeeMe for Windows currently permits only five nicknames. For example,
[MRU List]
Target1=pro60-test2.cit.cornell.edu
Target2=nysernet.org
Target3=fenris.hiof.no
Target4=sunten.wiezmann.ac.il
Other Users' Windows
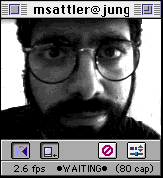
Figure 6.6 shows how another CU-SeeMe user who is transmitting might appear to you. The name that he has chosen appears in the title bar. A video image appears as he has adjusted it to appear. There is a set of buttons and a status bar below the image area.
The Video State button, shown in Figure 6.7, shows you whether the user is accepting video input or pausing the video.
The Audio button, shown in Figure 6.8, enables you turn to off sound from a particular person by clicking it until the soundwave icon disappears. When that user is transmitting audio, this button is shaded gray.
The Microphone button, shown in Figure 6.9, shows a red X if the user cannot transmit sound or has it turned it off or if you clicked a user's Microphone button to do unicast audio.
Sometimes, you will see a status bar that doesn't sport any of the sound-related buttons. This happens when someone is using the older version of CU-SeeMe for Windows, which doesn't support audio.
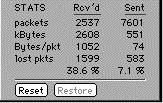
Consider Figure 6.11. The Transmission Statistics button, shown in Figure 6.12, shows statistics about packets, kilobytes, bytes-per-packet, and lost packets that you have received and sent.
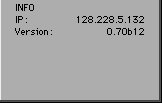
Consider Figure 6.13. The Version/IP button, shown in Figure 6.14, displays the IP address of the user and the version of CU-SeeMe that he is using. This is especially helpful when you are trying to debug a problem or figure out why a user cannot get access to a feature that you are using in the current version of CU-SeeMe.
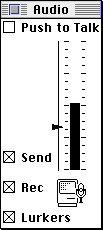
Audio Window
Your ability to send audio is controlled by the Audio window, shown in Figure 6.15. You must have, of course, a microphone connected to your computer, unless it has one built in. You will not be able to transmit or receive audio over a 14.4 kbps modem link nor, most likely, over a 28.8 kbps modem. The reason is that current sound transmission algorithms generate at a very minimum 16 kbps. What is being sent is already highly compressed, so it is unlikely that modem-level compression will help. Since audio communications over the Internet are a combination of the data being sent and overhead administrative routing and error-correction data, a 14.4 kbps modem won't be getting 14.4 kb of audio data per second, but a lesser amount, which has shown to be unintelligible. Charley Kline suggested that with one of the more ferocious compression methods, you might be able to push the bandwidth requirements down to about 10 kbps. For that, you would need a high-performance PowerPC processor to do the encoding and decoding.
You can move the triangle on the audio scale up or down to mark the squelch point for noisy environments. Sound levels received by the microphone below the squelch point are ignored as ambient noise. Levels above the squelch point are transmitted to the party to which you are connected. You must be connected for the audio scale to show movement. Likewise, speaking into a window showing the WAITING status will be unsuccessful (since by definition the connection is not in force).
If you are Macintosh CU-SeeMe users who is using a version of the Macintosh operating system before 7.5, you should get Sound Manager 3.0, which is available for free from ftp://ftp.apple.com/. Without it you will get annoying clicking during sound output, and your Macintosh will run extremely slowly while you are receiving audio. MacOS 7.5 - and higher - has the Sound Manager built in.
CU-SeeMe's Controls
This section is about the controls you'll use each time you use CU-SeeMe.
The Local Video Window
CU-SeeMe, at startup, checks the resources advertised by your particular computer configuration. If it finds appropriate hardware - such as video capture boards - or software - such as Apple's QuickTime extension and the appropriate video ditigizer component on non-AV Macintoshes, or MSVIDEO.DLL and the like for Windows - CU-SeeMe shows a video window (see Figure 6.16). If you see yourself in a video window, your camera is plugged in, operating, and pointing in the correct direction. Macintoshes with built-in digitizers, like the AV models, digitize and send video, opening a local video window even though a camera might not be connected to the Video In port. In this case, the Local Video window will be black. You will see WAITING, the current video state, below the video window until someone connects to you or until you connect to a reflector or another person. The identification name that you specified appears in the menubar. Four control buttons and the status line appear below the image.
The Flip Image button, shown in Figure 6.17, causes your image to be appear to be flipped, but it is not actually transmitted that way.
The Status Line toggle button, shown in Figure 6.18, determines whether the status line is visible. From left to right, the status bar contains
The frame rate that you can achieve depends on a number of factors: the CPU power available, the resolution, and possibly the screen depth chosen with the Monitors control panel. The frame rate is higher on a fast computer with CU-SeeMe running in the foreground, configured to use the smaller video window size - standard resolution - with the screen set to 16 grays or colors. Flipping the image or having part of the image off screen or covered by another window will slow your frame rate.
The connection status can be WAITING, TIMED OUT, DISCONNECTED, or nothing, meaning that it is normal and active.
The transmission cap limits the bandwidth used for sending video from your machine. Depending on amount of motion in the scene that your camera sees, the frame rate might also be affected. You can adjust the minimum and maximum values for the cap with the Transmission control. If the receivers report a packet loss in excess of five percent, the program assumes network congestion and automatically lowers the cap. It is adjusted upward toward the maximum value if loss reports aggregate to less than five percent. This system doesn't work well if a conference mixes receivers with greatly different bandwidths, such as modems and high-speed, direct-connect Ethernets.
The Freeze Video button, shown in Figure 6.19, pauses your video transmission. This button is often-used; many times the only way to send and receive intelligible audio is to free up bandwidth used by video for the audio stream.
The Options Area toggle button, shown in Figure 6.20, determines whether you can see the CU-SeeMe options area. If you click it, a pop-up menu appears. You can then change the digitizer being used (if you have more than one) and the CU-SeeMe audio, compression, picture, and transmission options.
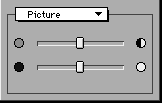
After you click the Options Area toggle button and the pop-up menu appears, you can adjust the CU-SeeMe Picture options (see Figure 6.21). There are two slider controls. The top slider controls the image contrast, and the bottom slider controls the image brightness. These two, in combination, can make your out-going image appear sharper, fuzzier, lighter, or darker.
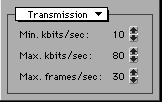
The CU-SeeMe Transmission options (see Figure 6.22) enable you to change the minimum kbps you send, the maximum kbps you send, and the maximum number of frames per second you send. It is customary to send no more than 80 kbps. Indeed, many reflectors will automatically disconnect you and prevent you from reconnecting for ten minutes if you violate this boundary.
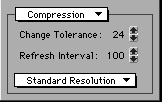
The CU-SeeMe Compression options (see Figure 6.23) enable you to change the video tolerance, refresh interval, and transmission resolution. Normally, you will change only the transmission resolution - and then only for point-to-point connections. High resolution sends four times as many bits as standard resolution; consequently, consequently, it really eats up bandwidth.
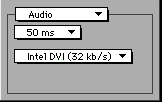
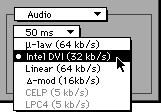
The CU-SeeMe Audio options (see Figure 6.24) enable you to select a transmission method and speed. Depending on your connection method, only certain audio options will be available, as in Figure 6.25.
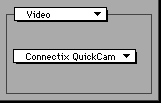
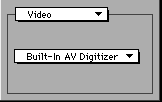
The CU-SeeMe Video options enable you to select a video digitizer resource for CU-SeeMe to use to access your camera hardware. Users of the Connectix QuickCam will see Connectix QuickCam, as in Figure 6.26. Macintosh A/V users will see Built-In AV Digitizer, as in Figure 6.27. Users of other hardware and software combinations will see yet other options.
CU-SeeMe's Menus
This section covers each of CU-SeeMe's menus.
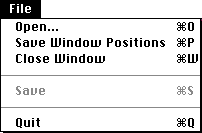
File Menu
The File menu, shown in Figure 6.28, is used to close a particular window, save all the window positions, and to quit CU-SeeMe.
Save Window Positions makes a note of the current positions of some of CU-SeeMe's open windows. The next time you start CU-SeeMe, some of the windows that were open when you chose this menu item will appear in the same place. Currently, the Talk Window's position isn't remembered.
Macintosh users with multiple monitors should be aware that the remembered window positions don't currently compensate for new monitor configurations. If you remove one monitor and run CU-SeeMe, you won't be able to get at some of the windows without removing the CU-SeeMe Preferences file and restarting CU-SeeMe.
Close Window closes the currently active CU-SeeMe window.
Quit causes all sending and receiving to stop, and the CU-SeeMe program stops running.
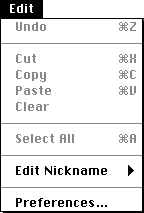
Edit Menu
The Edit menu, shown in Figure 6.29, implements the standard Macintosh editing and clipboard functionality. It is mostly used for cutting and pasting hostnames and IP addresses. CU-SeeMe's operating preferences are configurable from this menu, as are the nicknames that you have added.
Undo returns CU-SeeMe to the state it was in before your last action. This is rarely applicable to the operation of CU-SeeMe, so it is dimmed, or grayed out, most of the time.
Cut deletes selected, or highlighted, text and places a copy on the Clipboard.
Cut copies selected, or highlighted, text to the Clipboard.
Paste copies text on the Clipboard to the currently active text input area.
Clear deletes selected, or highlighted, text.
Select all causes all the text in the currently active text input area to be highlighted. Therefore, the text becomes available for the other Edit menu operations.
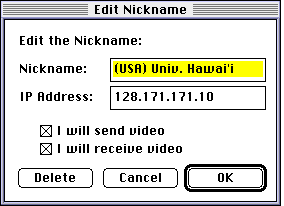
Edit Nickname enables you to select one of the nicknames that you previously gave to CU-SeeMe, either by entering it manually or by providing a Nicknames file. Choosing a nickname to edit brings up the Edit Nickname dialog box, shown in Figure 6.30. You use it to make changes.
Selecting the Preferences item causes the CU-See Preferences dialog box to appear (see Figure 6.3). It contains all the configurable aspects of CU-SeeMe and their current settings. You can change any of the settings that are available to you. Unavailable settings are dimmed, or grayed out, usually because you lack the hardware or software required for that particular functionality.
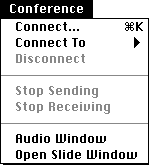
Conference Menu
The Conference menu, shown in Figure 6.31, controls aspects of CU-SeeMe usage relating to controlling sessions, also known as conferences.
Connect... brings up the Connect dialog box (see Figure 6.4).
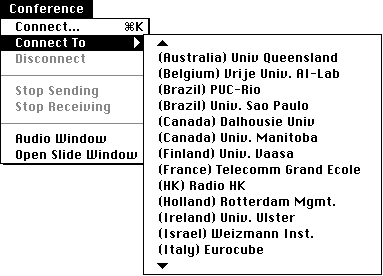
Connect To shows the pop-up list of nicknames that have been defined (see Figure 6.5).
Disconnect causes the currently active connection to be released. When you disconnect from a conference, CU-SeeMe ignores any audio or video from that IP address for one minute. This shouldn't cause any problems if you are skipping from reflector to reflector, but there is the possibility for confusion if you wind up connecting to the same machine within one minute. The delay is only one-way. If you disconnect from a conference, you can reconnect immediately, but that address cannot connect to you for a minute.
Stop Sending makes CU-SeeMe stop transmitting video and audio. Normally, you use it when you leave the room - sending empty office video is considered a breach of netiquette.
Stop Receiving tells the reflector that you don't want to have a bunch of video streams, which you won't see anyway, coming in - flooding your router, blocking access to your Web server, and wreaking havoc on your co-workers' ability to get a day's work done.
In addition to sending and receiving video and audio, CU-SeeMe users can also type to one another. This primitive in-window text system is the original way in which CU-SeeMe users communicated via text. Macintosh CU-SeeMe users now have the Talk window, a much better tool.
Your audience - one point-to-point participant or many conferences on a reflector - will see the alphanumeric characters that you type. The backspace key deletes the last character; you can clear the entire text with the Enter key. Text appears at the bottom of the video area; you move it to the top with the up-arrow key and to the bottom with the down-arrow key. To scroll your text, you use the left-arrow key; you stop it with the right-arrow key. (It is considered extremely impolite to leave text scrolling when you leave your desk because it changes an otherwise still image and causes CU-SeeMe to generate traffic to all the people who are watching you.)
The Slide window is a primitive whiteboard collaboration tool. It is described later in this chapter, in the "Auxiliary Data Function Modules" section.
Participants Menu
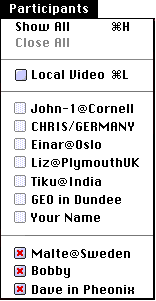
The Participants menu (see Figure 6.32) controls your interactions with others sharing the videoconference. The Show All and Close All controls show and hide all video windows. The Local Video control shows the local video window if it is hidden. The menu item is active, or black, when the local video window is showing. It is dimmed, or grayed out, when the local video window is hidden.
In Figure 6.32, the group of names with a Blank Screen icon are conference participants whose computers are capable of sending video. You can interact with these folks via video and the Talk window. The group of names with the Red X Active Window icon, are lurkers whose computers are incapable of sending video in their current setup. You can interact with lurkers via the Talk window.
Auxiliary Data Function Modules
To most people, CU-SeeMe is a basic audio and video communications tool. To at least one of the CU-SeeMe development team, Aaron Giles, CU-SeeMe was a transport mechanism first and foremost. Out of this realization came the Auxiliary Data Transport. Auxiliary Data Function Modules, sometimes known as plug-in or drop-in modules, can extend CU-SeeMe's capabilities in ways that its developers never expected. When a module is dropped into CU-SeeMe's folder, it produces a new menu bar item and gives you additional communications functionality. AuxData Transport, as it is also known, is a method of using CU-SeeMe to deliver arbitrary data. The word arbitrary gives a clue as to the real power of AuxData Transport.
Programmers can use AuxData Transport to package and deliver any data that they can describe programmatically in AuxData Transport Function Modules. These data are known as items to AuxData. Items include strings of text (used in the Talk Window Function Module) and images (used in the built-in Slide Window Function Module).
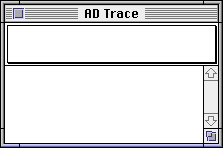
AD Trace Menu
The AD Trace menu, shown in Figure 6.33, appears only when you have placed the Auxiliary Data Trace Function Module in the same directory as the CU-SeeMe program. AD Trace FM is available from Cornell University.
Trace is a debugging tool for software engineers who are creating function modules to extend the capabilities of CU-SeeMe. The Function Module Developer's Kit, also available from Cornell, consists of documentation, sample plug-ins, and a CodeWarrior project with libraries to facilitate the development of function modules.
If you select Show AD Trace Window, the AD Trace window appears (see Figure 6.34). The AD Trace window shows all AuxData items as they come and go.
Operation of the AD Trace window is explained in the Function Module Developer's Kit.
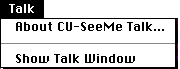
Talk Menu
The Talk menu, shown in Figure 6.35, appears only when you have placed the Talk Function Module in the same directory as the CU-SeeMe program. Talk FM is available from Cornell.
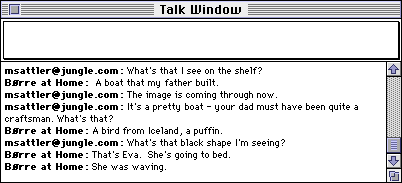
The Talk window, shown in Figure 6.36, is a sample plug-in that extends the capabilities of CU-SeeMe by providing a robust way for users to communicate with one another by typing. Low-bandwidth users, such as those connected to the network with 14,400 kbps modems, cannot use audio to communicate; therefore, text becomes especially important. The Talk window was written by Aaron Giles of the Cornell University Medical College. He developed the plug-in architecture as a demonstration of the usefulness of Auxiliary Data Transport. He succeeded.
If you select Show Talk Window, the Talk window appears. What you type appears to others who have also installed the Talk Window Function Module. The name that you have chosen for yourself - the video title in the CU-SeeMe preferences - appears in front of each line of text you type as soon as you hit the Return key. Currently, only the menu controls - as opposed to the command keys - work for cutting and pasting to and from the Talk Window Function Module.
Slide Window
The Slide Window Function Module is now part of CU-SeeMe for Macintosh. It is a primitive whiteboard mechanism that enables you send pages of information to an audience during a presentation, just as presenters show slides through a projector. To send and receive sides, you must have QuickTime and its subsequent bug fixes and enhancements, Apple Multimedia Tuner and PowerPlug, installed because the Slide window uses QuickTimes' JPEG image compressor to lighten the transmission load.
Two conditions must be fulfilled for someone to send slides to you:
The reverse must be true if you want to send slides to someone. Likewise, you cannot send slides if you select Stop Sending from the Preferences menu, but you can if you pause the video, which makes even more bandwidth available for the sending of slides. Sending slides uses up to seventy percent of available bandwidth, based on the current transmission capacity setting. Sharing a slide can take time if the cap is set low and the slide cannot be compressed significantly.
Select Open Slide Window from the Conference Menu. The nonresizeable 640-by-480 pixel window with a button panel appears (see Figure 6.37). You can now receive slides. Two modes are associated with using the Slide window: Local and Remote. When the Local button is highlighted, you are in control of which slide appears; you can grab slides, send them, and cue them for participants. In Remote mode, you just watch; and someone else controls the slides that you see.
While in Local mode, you can use the Prev and Next buttons to move backward and forward through the slides that have been accumulated.
The Discard button irrevocably deletes the current slide.
The New button enables you to preview a screen capture in the Slide window, freezing the normal video. If you press the New button, its label changes to Grab. Press Grab; the image in the Slide window freezes and the camera returns to normal CU-SeeMe mode. You can press New and Grab repeatedly to collect a series of slides and send them later during the conference. Future versions will enable you to save stacks of slides, send them in advance, and merge stacks. For now, if you quit the application - on purpose or accidentally - you will lose the whole stack that you have acquired. On a slow machine, the mode switches can be very slow, and you might find that double-clicking the New/Grab button makes things easier.
The Send button is active if anyone else in your conference or one-on-one session has his Slide window open. Press Send to transmit the image.
If you use the Prev and Next buttons to move to one of the slides that you have created, you can use the mouse to display a cursor on the slide. This cursor is larger than the normal Macintosh mouse pointer icon. When you put the Slide cursor in the Slide Window by clicking or dragging, everyone who has their Slide window cued to that particular slide sees a copy of the pointer moving across the slide in synchronization with yours. Get rid of the cursor by dragging it out of the window.
When you transmit a cursor, special messages go along with your video signal. At the receiving end, viewers see the top left square in your video window flicker strangely - a useful technique to show who is transmitting a cursor. After you click the cursor to position or stop dragging, whoever received it cannot accept cursor messages from anyone else for ten seconds.
Currently, the Slide window has no brightness and contrast controls. With an AV Macintosh, the same controls affect both windows. With non-AV Macintoshes you must manage the lighting directly.
The Connectix QuickCam does not produce a 640-by-480 pixel image. If you use the Slide Window with a QuickCam you'll get a 320-by-240 pixel image centered in the Slide window with unintelligible garbage - the representation of the computer's RAM - surrounding it. This shortcoming will be dealt with in a later release, possibly by having the image expanded to fit the full size of the Slide Window.
It is possible to set up a switch with a second video camera, pointing downwards to a document table, as a dedicated slide-acquisition device. The CU-SeeMe development team has been testing a device made from $20 worth of electronics to switch cameras under software control via commands sent through a serial port. They plan on adding this as an option to CU-SeeMe. When that's done, schematics for this device will be available from my web site.
If you have been in Local mode and then go to Remote mode, you automatically position to the last slide cued by someone else. That is, you catch up to the current state of the conference. After someone cues a slide, you cannot cue anything for ten seconds. Currently, you have no way to know when you the time-out is over.
The CU-SeeMe development team has indicated their intention to improve the Slide window in the future. They plan to improve the cursor handling so that you can point to other conferencees' slides as well as being able to tell who is pointing to whose slides.
CU-SeeMe Resources on the Internet
The CU-SeeMe user community is a far-flung supportive group of people - from experienced reflector operators to new CU-SeeMe users. Much of this book is the result of people helping others and posting their results to the CU-SeeMe discussion mailing list.
CU-SeeMe resources on the Internet are dynamic, subject to change. Instead of filling this section with Universal Resource Locators that may be stale by the time you read this book, I provide pointers to pointers. Many of us update our Web pages on a semimonthly basis, so the information there should be up to date.
Dr. Timothy Mulkey of Indiana State University is directly responsible for much of the following being available to you on a fast Web server. Tim is a great fan of CU-SeeMe, so much so that in early 1994 he graciously donated one of his computers to be a repository of information for and by the CU-SeeMe user community. That machine, www.jungle.com, is an active Web server and list manager. (An honorable mention should be made of the mysterious Steve, a shadowy figure of a systems and network administrator who keeps this machine up and running. Thank you, Steve.) This machine is host to several mailing lists, searchable archives of all the CU-SeeMe-related mailing lists, and several megabytes of Web pages.
Mailing Lists
There are several mailings lists devoted to the discussion of various aspects of CU-SeeMe. One of them is sure to cover your interests. To subscribe to a mailing list,
The Cornell University CU-SeeMe development team maintains an email list devoted to announcing significant advances in the technology, new releases of the software, and the like. This list has very light traffic.
To subscribe to Cornell University's CU-SeeMe Announcement List, send e-mail to listserv@cornell.edu that reads
subscribe CU-SeeMe-Announce-L firstname lastname
The Cornell University CU-SeeMe development team maintains an email list devoted to on-going technical discussions about the software, reflectors, trouble-shooting installation, related software and hardware, and events that involve CU-SeeMe. Event information is migrating to the Events List, however. This list has very heavy traffic. It is a superset of Cornell University's CU-SeeMe Announcement List, so you don't need to subscribe to both.
To subscribe to Cornell University's CU-SeeMe Discussion List, send email to listserv@cornell.edu that reads
subscribe CU-SeeMe-L firstname lastname
Tim Mulkey and I host a CU-SeeMe Events mailing list. It provides announcements and discussions of broadcasts and events over the Internet that use CU-SeeMe. The goal of this list is to provide information concerning public broadcasts in which CU-SeeMe users may wish to participate or lurk. The Events list might be automatically coordinated with John Lauer's excellent CU-SeeMe Event Guide Web pages by the time you read this.
This list is not for the discussion of hardware or software problems. Problems and technical questions should be sent to Cornell University's CU-SeeMe Discussion List.
To subscribe to our CU-SeeMe Events List, send email to list-admin@www.jungle.com that says
subscribe cusM-Events firstname lastname
If you would prefer to receive a daily digest of the messages to our CU-SeeMe Events List, send email to list-admin@www.jungle.com that reads
subscribe cusM-Events-Digest firstname lastname
Tim Mulkey and I also host the CU-SeeMe Reflector Operator's mailing list, which is used to coordinate reflectors for public broadcasts and events over the Internet and to provide a forum for information exchange and assistance between reflector operators. The information exchanged on this mailing list is geared to reflector operators rather than the CU-SeeMe end user.
This list is not for the general discussion of events - other than the logistics of the events as important to the operators of coordinating reflectors - nor for the discussion of hardware or software problems. Problems and technical questions should be sent to Cornell University's CU-SeeMe Discussion List.
To subscribe to our CU-SeeMe Reflector Operator's List, send email to list-admin@www.jungle.com that reads
subscribe cusM-Reflector firstname lastname
If you would prefer to receive a daily digest of the messages to our CU-SeeMe Reflector Operator's List, send email to list-admin@www.jungle.com that reads
subscribe cusM-Reflector-Digest firstname lastname
World Wide Web Pages
The World Wide Web is a great medium for publishing up-to-date information in a world of rapidly-changing software and hardware. Much of the evangelism about CU-SeeMe was originally done over the web. Just as this book encapsulates the past years of changes on my web pages, I expect future editions of this book to reflect the monthly (and often weekly) changes on my web site. When in doubt, check the web sites listed here for current information, configuration settings, and trouble-shooting assistance.
Following are some of the things you'll find at my CU-SeeMe web site, at http://www.jungle.com/CU-SeeMe/
Cornell University has recently started hosting the official CU-SeeMe web pages, of which I am the curator. My web site points to many CU-SeeMe related web pages, some of which are technical in nature, others are devoted to the art and science of videoconferencing and digital human interaction. There's even a web page devoted to all the devices you can manipulate by remote control - truly interactive videoconferencing.
You'll find the definitive list of CU-SeeMe reflectors world-wide in BinHex 4 format (for Macintosh) and in ASCII format (for Windows). Instructions for using the list are included in the document.
Rapidly-changing information, Frequently Asked Questions, configuration information from your fellow CU-SeeMe users, and the URLs for some fairly incredible World Wide Web pages - Eva and Borre Ludvigsen's home-on-the-net pages come to mind - are available from my web site. You'll also find a gallery of images, including a Rogues' Gallery of CU-SeeMe users.
Searchable archives of the CU-SeeMe Discussion List, CU-SeeMe Event List, and the CU-SeeMe Reflector Operator's List can be found at http://www.jungle.com/CU-SeeMe/all_archives.html.
The current and historic load on www.jungle.com is available to you in a great variety of forms. Interested in seeing how many people are hitting this server and where they come from? Check out the multigraph statistics page at http://www.jungle.com/stats.html.
USENET Newsgroups
There is currently a proposal for the creation of several USENET newsgroups being voted upon. By the time you read this, there may be newsgroups devoted to new CU-SeeMe users, CU-SeeMe for Macintosh and CU-SeeMe for Windows technical questions, up-coming events, and to reflector operators. Check the web pages for the current status of the voting process.
Summary
The User's Guide represents the current state of CU-SeeMe. It's a rapidly-changing program, driven by many different groups of users who are connected in all sorts of ways: slow modems, fast modems, ISDN, and of course, the high-performance local-area and wide-area networks for which CU-SeeMe was originally designed. As Cornell University's free versions and White Pine's commercial versions of CU-SeeMe continue to evolve, the web pages and subsequent editions of this book will change to reflect the growing power of CU-SeeMe.
A quick note of thanks to Jher, who helped me to write the original CU-SeeMe User's Guide several years ago.
|
| Have you found errors nontrivial or marginal, factual, analytical and illogical, arithmetical, temporal, or even typographical? Please let me know; drop me email. Thanks! |