|
|
 subscribe
|
subscribe
|

5. Software |
. . . . . . . . . . . . . . . . . . . . . . . . . . . . . . . . . . . . . . . . . . |
Internet TV with CU-SeeMe: Chapter 5 - Software
???Author: Hi, Mike. I wanted to send this to you for an earlier-than-normal review because there seems to be a large section (about Windows) missing. Our process here only works when everything's streamlined, and since it looks as though a significant amount of text and possibly more figures will be added, I'd rather you complete the writing phase on this chapter before a copy editor proceeds. Please return it ASAP, so I can get it back in place with the editorial flow.
Also, regarding figures for this and other chapters; I'm not sure what your original intention was for them, but if we could talk about placement and requirements I'd have a better idea about directing the directives and planning layout workarounds. Give me a call when you've read through this chapter. Thanks.
-fran
???Developed by Dean Miller 8.23.95
5
Software
Networking Software
In order to use any Internet videoconferencing audio or video software, you'll need to be connected to an IP network. The most common ways you'll be connected are directly (a wire attaches your computer to the network), via modem (you dial up and connect to an Internet service provider), or via ISDN (described in Chapter 4, Hardware). Less common methods include packet radio (enjoyed by amateur "ham" radio operators). A number of common issues face the Macintosh or Windows user who wants to connect to an IP network, so I'll cover the common ground first, and attack the platform-specific areas later.
Regardless of your connection method, you'll need to configure your TCP/IP software after you install it. Table 5.1 shows the information you'll need to get. I suggest you photocopy these pages, call your site administrator or Internet service provider, and fill in the blanks. Doing this ahead of time will make installing and configuring your network connection much less frustrating.
Table 5.1. TCP/IP connection information.
Item Example Your settings
Connection method Direct, modem, ISDN How will your computer be connected to the network?
Addressing method Manual (aka "Static" or "Fixed"), How will you get an IP
Server, Dynamic address?
IP address (if Manual) X.X.X.X If manual, what's your IP address going to be?
Gateway address X.X.X.X What's the IP address of the machine that sits between your network and the Internet?
Network class A, B, or C Necessary geekly information (discussed in Ch. 4)
Subnet mask 255.255.255.0 How will the computer interpret your IP address?
Primary Nameserver X.X.X.X What machine will translate names to addresses?
Secondary Nameserver X.X.X.X What machine should be used if the primary is down?
Your domain jungle.com How to tell what machines are local, and which are "out there?"
NNTP news server nntp.jungle.com Where to get USENET newsgroups from and post replies to.
SMTP mail machine smtp.jungle.com Where to place out-going email.
POP account cu-seeme-book@jungle.com Where to get in-coming email.
Email address cu-seeme-book@jungle.com How people will get email to you.
???Author: Please double-check this table formatting. -dean
Those of you using modems to connect to an IP network (typically via SLIP or PPP) will need the information shown in Table 5.2. Since you'll be getting this information from the same people, you might as well get it all at once.
Table 5.2. Modem connection information.
Item Example Your settings
Provider's phone number 555-1212 Who do you dial to get connected to the net?
SLIP or PPP? SLIP What connection protocol will you be using? SLIP is also known as RFC 1066; PPP is also known as RFC 1661.
Compressed headers? Can you eke a bit more bandwidth by using compressed headers? This is also known as RFC 1144 TCP Header Compression, CSLIP, VJ SLIP, and Van Jacobsen SLIP. PPP communicates compressed header information during session negotiation; there's no such thing as CPPP (nor for that matter, CCCP).
Login (or Username) Susername How will your provider identify you? It's common to have a leading capital S or P to denote SLIP or PPP, respectively.
Password cat7green How will you "authenticate" yourself? The minute money or reputation is concerned (and your net connection has both) this becomes important.
MTU, MRU (see note) What's the maximum transmit (or receive) unit size? Typical numbers for MTU are 1006 (SLIP) and 296 (CSLIP); for MRU expect to see 1500 for PPP.
Login procedure? (see note) PPP typically requires no script; its negotiation procedure is "automagic". SLIP typically requires a script to understand what your provider's side is doing. A well-commented SLIP script (that I've used for years with my Internet service provider) may be found at (PUT URL HERE).
???Author: What do you mean by (see note)? Where is this note? Also, please double-check the table's formatting again. -dean
Whew! Time to take a rest. Hopefully you were able to get all the necessary information. Now we divide the Macintosh and Windows users.
Macintosh
TCP/IP has come a long way on Macintosh since the first release of MacTCP. MacTCP 2.0.6, the current, and probably last release of MacTCP, offers rather robust TCP/IP connectivity with a few ecentricities. (Some might say "bizarre quirks.") In autumn 1995 Apple will phase out the existing, separate, packages for AppleTalk and MacTCP delivery. In their place will come Open Transport for Macintosh, delivering multiprotocol support in one package. This will be for both 68K Macintosh and Power Macintosh. Minimum system requirements will be:
Open Transport will move into the MacOS mainstream, too.
Open Transport may be obtained in many ways: it's part of many Macintosh system software releases (beginning with MacOS 7.5.2), it's a stand-alone software package, and it'll be licensed and available from many of your Internet service providers. But since MacTCP won't be going away just yet, I cover its use here as well.
These are the steps you'll take to get your Macintosh speaking TCP/IP:
1. Install the TCP/IP layer software - Open Transport or MacTCP
2. Install the modem layer software - one of several SLIP or PPP packages
3. Restart your Macintosh
4. Configure what you've just installed
5. If you've installed MacTCP, restart (so that it can build its MacTCP DNR document)
(f)Installing Open Transport
[Image Open Transport is a snap to install; it comes with its own installer. An Easy Install will result in two new control panels, AppleTalk and TCP/IP, and a variety of support files being placed into your System folder. If you're upgrading from MacTCP to Open Transport, be warned that the installation process will delete the MacTCP control panel. Please, before you install Open Transport, open up MacTCP and jot down the settings information.) After installation, you'll be prompted to restart your Macintosh.
???Michael: There's too many figures in this chapter. I think we should just keep the ones with figure captions and get rid of the others. -dean
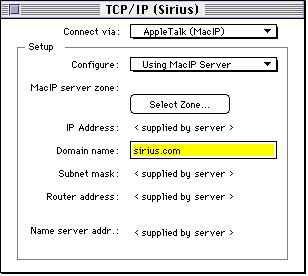
Once you're back up and running, open the TCP/IP Control Panel (shown in figure 5.2).
[Image
This is the way you'll control your Macintosh's ability to speak TCP/IP to the outside world.
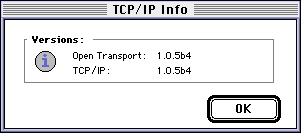
[Image To start things, select Get Info from the File Menu. The version information window will appear (figure 5.4). Note that I'm using Open Transport 1.0.5b4, the latest version available to beta-testers to date. By the time you read this, a release will be available. I don't expect the user interface to change, but if what you see on your screen doesn't match what you see here at least you'll know why. (An informed reader is a happy reader.)
[Image
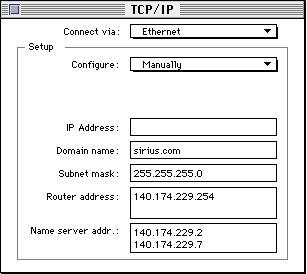
Open Transport is easy to configure, provided you have the requisite information. Starting from the top, I'll show you how I set up my TCP/IP Control Panel.
[Image
The Connect via pop-up menu displays the current connection paths that TCP/IP knows of. Depending upon your hardware and software configuration, you'll see options different from what appears here.
[Image
The Configure pop-up menu displays ways TCP/IP has of finding configuration information. They are
[Image
Since I use server-based addressing (also known as "dynamic IP" addressing), my Macintosh receives its IP address when I connect. So I keep this box blank. All other configuration options will result in the IP Address text field looking like this:
[Image
[Image
Type your provider's domain name into the Domain name text field.
[Image
The subnet mask describes how addresses on a network are interpreted. (See Chapter 4, Hardware for an in-depth example.) Open Transport relies on being able to communicate with the network device that is the gateway between your local network and the outside world. This device is known to Open Transport as "the router". Type the subnet mask of your provider's gateway router into the Subnet mask text field.
[Image
Type the IP address of your provider's gateway router into the Router address text field.
[Image
Lastly, Open Transport needs to know where it can find Domain Name Services (to translate text machine names (like gildenstern.jungle.com into numeric IP addresses (like !!!!!!!!!!!!!). Although the text field only shows two IP addresses, I entered my provider's three name-servers, one per line, with a carriage-return between them.
When you're finished entering this information, close the TCP/IP Control Panel. You'll be asked whether you wish to save this configuration. Say yes. Uncharacteristically for a Macintosh application, you won't be prompted for a configuration name; Open Transport will name this configuration Default.
[Image
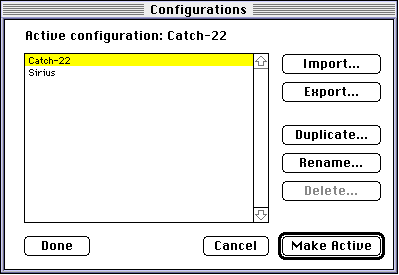
If your Macintosh speaks TCP/IP over several different networks, you'll have several different TCP/IP configurations. Choose Configurations from the File menu; the Configurations window will appear (figure 5.14).
[Image
I renamed Default to Sirius, and then created a new configuration named Catch-22, to reflect the settings I need to use in order to use another Internet service provider that I use in San Francisco. When you want to switch TCP/IP between different configurations (because you've moved from one network to another), you'll use the Configuration window to pick the current one. And you won't have to reboot your Macintosh for the new choice to become active. That's right, you can switch between radically different configurations "on the fly", without rebooting. (Thank you Open Transport development team.)
To finish up Open Transport, here are a few odds and ends.
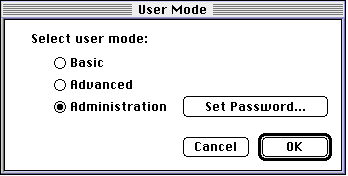
Select User Mode from the Edit menu. You'll be presented with the User Mode selection window (figure 5.15).
[Image
[Image
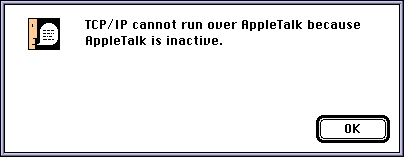
Because you don't need to reboot after changing your TCP/IP configuration, you'll need to know when connectivity options are available to you. When you're using or configuring TCP/IP you'll be told things like AppleTalk is not available to you because it's inactive (Figure 5.17)
[Image
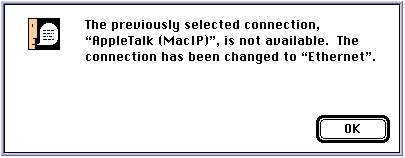
when it's not available to you because it's busy,
[Image
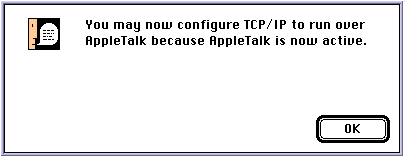
and when it finally becomes available to you.
[Image
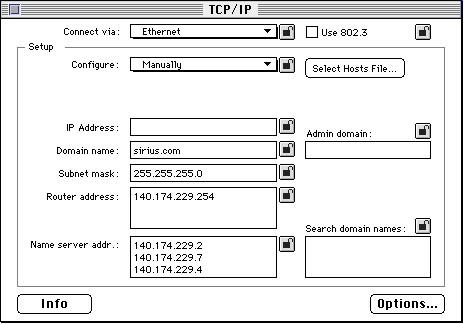
Open Transport lets you talk TCP/IP over an AppleTalk network. Figure 5.20 shows what the TCP/IP control panel looks like (and what you have to set up).
[Image
(f)Installing MacTCP
Historical note: I penned the great-great-grandmammy of this chapter in 1993, in a technical note entitled Connecting your Macintosh to the Internet via TCP & SLIP. To see how far we've come since then, check out
ftp://ftp.tidbits.com/pub/tidbits/tisk/info/installing-mactcp-interslip.txt".
Okay, on to MacTCP. Installing MacTCP is easy: drag the MacTCP control panel onto your System folder, or drag it directly into the Control Panels folder (which lives inside the System folder). Configuring MacTCP is a bit more involved.
(f)Installing InterSLIP
Software that lets your computer speak TCP/IP over a modem is composed of an extention part (used by MacTCP) and a control part (used by you, the human).
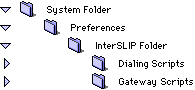
Installing InterCon's InterSLIP requires that you place the extention part (named InterSLIP) into the Extentions folder inside the System folder, the control part (named InterSLIP Control) into the Control Panel folder inside the System folder, and an administrative tool (named InterSLIP Setup) somewhere accessible. I put it into the Apple Menu Items folder inside the System folder.
(f)Installing MacPPP
Installing Merit's MacPPP requires that you place the extention part (named PPP) into the Extentions folder inside the System folder, and the control part (named Config PPP) into the Control Panel folder inside the System folder.
(f)Configuring MacTCP
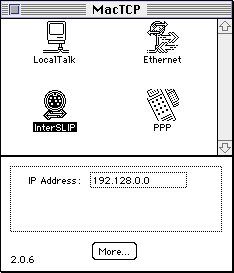
When you open up the MacTCP Control Panel you'll see something like what's in figure 5.21. (Notice that it's not typical to have InterSLIP and MacPPP installed at the same time - especially as they seem to intermittently confuse MacTCP. You'll likely use one or the other. InterCon's upcoming InterPPP II costware will render the question moot, as it does both PPP and SLIP.)
Home
Select the icon that describes the way you'll be connecting. We've already mentioned SLIP and PPP. If you'll be connecting to an Ethernet network (through a built-in Ethernet - like on my PowerBook 520c - or a third-party SCSI Ethernet box) select the Ethernet icon. If you'll be speaking TCP/IP over a LocalTalk network, select that icon. In any case, you've now told MacTCP which connection method you want to use.
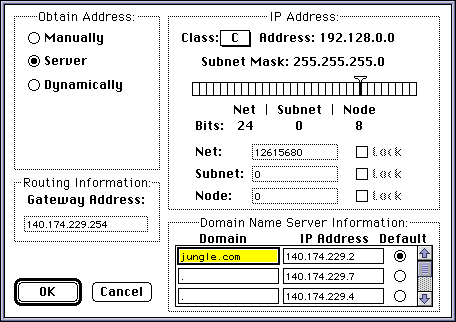
Look back at your photocopy of table 5.1. If you'll be using Manual addressing, also known as Static or Fixed addressing, then your provider should have given you an IP address. Enter that IP address in the input area provided. Then hit the More button to bring up the MacTCP configuration dialog box, shown in figure 5.22.
[Image
Let's start with the Obtain Address radio buttons. Your provider will have said that you'll get your IP address either Manually (and the IP address was already given to you) or via Server (the provider's computer gives you a free IP address from a pool of addresses). Select the appropriate radio button. Don't be confused by a strange quirk of geek-speak: a server-based address is known as a "dynamic" address (as opposed to a "fixed" address). Nobody uses the "Dynamically" setting - that seems to have been an evolutionary dead-end.
[Image Moving down to the Routing Information Gateway Address area, enter the gateway specified by your provider. In some cases it'll be determined automatically, but it's a required address for Open Transport, so it's best you explicitly get it.
?? I'm getting confirmation from Garry Hornbuckle of Apple about the Gateway stuff in MacTCP - I've heard it can't be manually edited in some circumstances.
[Image Moving over to the Domain Name Server Information area, let's tell MacTCP which of your provider's networked machines will translate machine names (such as gildenstern.jungle.com) into a numeric IP address. You should have received, from your provider, IP addresses for a primary and a secondary nameserver (and written them into your copy of table 5.1.
My local domain is jungle.com. If I'm using the machine named gildenstern.jungle.com and I want to connect to rosencrantz.jungle.com, I'm in need of name services for my local domain. This is how we set that up:
1. Enter your provider's domain where you see jungle.com in figure 5.22.
2. In the IP address box just to the right of that box, enter the IP address of your primary nameserver.
3. Click the Default radio button.
Okay, you've now told MacTCP what nameserver to use for local requests, and you've ensured that single-word machine names, such as TT>gildenstern, will have the local domain, jungle.com in our example, appended.
What about requests for name services for machines outside your domain? Well, this is how you'll set that up:
1. Enter a period in the text box under your domain.
2. In the IP address box just to the right of that box, enter the IP address of your primary nameserver.
Now the primary nameserver will be consulted for requests inside and outside of your domain, just as it should.
What happens if the primary nameserver is having a bad day, and has crashed or is otherwise unavailable? This is how we provide a secondary nameserver:
1. Enter a period in the Domain box on the third line.
2. Enter the IP address of your secondary nameserver.
If you have a tertiary nameserver, use the scrollbar to move to the next free line and enter a period in the Domain box and the IP address of your tertiary nameserver in the accompanying ID address box.
[Image Lastly, let's look at the IP Address area of the MacTCP configuration dialog window. Usually you'll not have to mess with this at all. If you do, ask you local Mac networking guru for some help. Between the bewildering complexity of possible network setups you may be a part of, including subnetting and supernetting (as discussed in chapter 4), and a known bug in the network class pop-up window, comprehensive instructions on how to configure this section would require a separate volume the size of this book. But, take heart, you'll rarely have to tackle this section, and if you do, someone in your organization probably has been through it before.
[Image When you're finished following these instructions, click the OK button to close the MacTCP configuration dialog window, and then hit the close box to close the MacTCP control panel. Depending upon the changes you've made, MacTCP will remind you that rebooting your Macintosh is necessary for the changes to take effect. That's because MacTCP updates the MacTCP DNR (Domain Name Resolver) and MacTCP Prep files when your Mac is starting up. (Sometimes these files can be corrupted by a computer crash. When I troubleshoot my MacTCP connection restart every time I've changed my MacTCP configuration, whether it prompts me to or not. When things are behaving erratically I throw these files away and restart. When things are really higgeldy-piggeldy I throw away all MacTCP files (including the Control Panel) and reinstall from scratch.)
The next step in getting on-line is to configure your chosen SLIP or PPP; there is quite a variety of freeware and costware software packages available. I've chosen two of the more popular freeware choices: InterCon's InterSLIP and Merit's MacPPP.
(f)Configuring InterSLIP
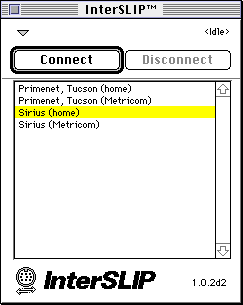
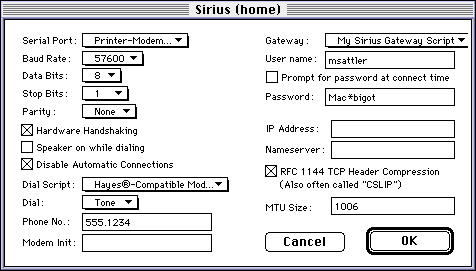
Open up InterSLIP Setup, which will be in the Apple Menu if you've followed the installation suggestions. Figure 5.27 shows the setup window with the "see more" triangle pointing downwards. ("See less" by clicking once on the arrow.) In the example shown you see four configurations I have set up, two each for my local Internet service provider in San Francisco (Sirius) and for a provider when I visit my godchild, Kaeli, in Tucson, Arizona (Primenet). (The "Metricom" versions have extra control information for a Metricom wireless modem - a necessity when my Kaeli decides to run for it.)
[Image
Choosing New from the File Menu will result in a new configuration name dialog box (figure 5.28).
[Image
When you enter a name and click the OK button you'll be presented with a configuration window (figure 5.29). (There's no Delete button; the configuration files are kept in an InterSLIP Setup folder in your Preferences folder - delete a configuration by dragging it to the Trash.)
[Image
Going counter-clockwise, let's examine and set each of the controls.
[Image
The Serial Port should be set to indicate where you've attached the modem. This can be the Modem Port (the most common choice), the Printer Port, an Internal Modem, the Printer-Modem port (if you have a PowerBook 5xx), or the Upper or Lower Card Slot on Macintoshes that have PCMCIA capability.
[Image
The Baud rate refers not to your modem speed, but the communication speed between your Macintosh and the modem. All my 14.4 kbps and 28.8 kbps modems are driven with a serial port speed of 57600 bps. Your mileage may vary.
[Image
Most Internet service providers use 8 data bits, 1 stop bit, and no parity bit.
[Image
The Hardware Handshaking checkbox should be checked if you have a v.32bis modem - all my 14.4 kbps and 28.8 kbps modems came with a hardware handshaking cable; your's probably did too.
The Speaker on while dialing checkbox should be set on until you've gotten everything debugged, after which time the novelty of piercing schrieks will doubtlessly wear thin and you can turn it off.
The Disable Automatic Connections checkbox prevents InterSLIP from automatically dialing your Internet service provider whenever a program on your Mac wants to speak out. This sounds like a great service to have, but I've found that it's a great bother in practice. ("In theory, there's no difference between theory and practice. In practice, however, ...")
[Image
The Dial Script pop-up menu should most likely be set to Hayes-Compatible Modem. I have yet to see a modern modem that wasn't, but then I steer away from the bargain-basement El Cheapo special modems. If your modem isn't basically Hayes-compatible, your life will quickly become an unenviable misery. (Well, maybe it's not that bad - InterSLIP supports other modems through the Connection Control Language (CCL) scripting language. Adam Engst, the author of several great books and the e-zine TidBits, has assembled a collection of CCL scripts for a variety of modems at
ftp://ftp.tidbits.com/pub/tidbits/tisk/tcp/
Their names begin with "scr" (for script) and include the modem they're written for. Figure 5.35 shows the folder hiearchy for InterSLIP; place any dialing scripts you've obtained into the Dialing Scripts folder.
[Image
The next three items, Dial, Phone No., and Modem Init, become available for you to configure when you set the Dial Script option.
[Image
Most people (in the USA) now enjoy touch-tone dialing.
[Image
The dial-up telephone number should have been given to you and is hopefully part of your Table 5.2 crib sheet.
The modem initialization string can often be left blank. AT&F will usually set your modem to the factory-default settings. Your modem manual will have a comprehensive (if bewildering) list of all the settings your particular modem supports. For most folks, the sticking points (if any) are turning hardware handshaking on and software handshaking (also known as XON/XOFF) off.
[Image
The Gateway pop-up menu specifices how you'll navigate your provider's SLIP harbor. Simple Unix/Telebit works for many folks, but as my provider uses a non-standard system, I had to write my own CCL script. It's completely commented (the closest thing I've found to a CCL instructional manual) and available at
Adam has also collected gateway scripts for your enjoyment. Again, the names begin with "scr" (for script) and include the name of an Internet service provider, university, or terminal server manufacturer such as Cisco. Gateway scripts are placed into the (surprize!) Gateway Scripts folder.
[Image
Specify your user name (also known as a login name) given to you by your provider in the User name text input box. Type it exactly as it was given to you, as UNIX is case-sensitive. "MSATTLER", "MSattler", and "msattler" are three different user names.
Here comes a security issue. You can divulge your password to InterSLIP, but then anyone who has access to your computer can find out that information. Whether you'll use this option depends upon whether you are able to maintain "site security" (in the parlance of the security world). If you're the sole user of your Macintosh (perhaps it's a home machine or you have a PowerBook that's always at your side) or you trust the other users (your significant other and your cat), then it may make sense to entrust your password to InterSLIP. If your computer is at your office, or part of a school computing laboratory, it may make less sense to do so (a lot less sense). (Of course my password isn't "Mac*Bigot", or anything remotely like it.)
[Image
I leave the IP address and Nameserver address areas blank (because MacTCP already knows that information).
[Image
Because I want to maximize every last bit of data throughput that I can from my modem connection, I've asked my network administer to serve me using compressed TCP packet headers and I've appropriately set the RFC 1144 TCP Header Compression checkbox. This is an all-or-none setting; both you and your provider must be in sync about this. A mismatch in either direction will cause strange connection behavior and possibly no connection at all.
[Image
Lastly, you'll need to enter the Maximum Transmit Unit size from your Table 5.2 crib sheet.
Then click the OK button to save your configuration. Repeat this process for every configuration you want to set up. If you're like most folks, and have only one Internet service provider (and therefore only one configuration) you can click the "show less" arrow to shrink the InterSLIP Setup window (fig. 5.43). This takes up less screen "real estate", making it easier to see other windows. (If you place InterSLIP Setup onto a second monitor - if you're lucky enough to have one - and then move (or remove) that monitor, InterSLIP setup may crash and burn. The work-around is to delete the InterSLIP Preferences file. Since it only contains the now-invalid window position and which configuration file was selected, it's easy to recreate.)
[Image
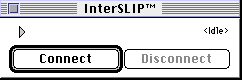
Using InterSLIP
Add basic prose about using the Connect button
Users of Apple's Control Strip or Mice and Men's Desktop Strip can use Infinity System's InterSLIP Strip Module to connect and disconnect without opening InterSLIP Setup at all. Desktop Strip and Control PPP CSM may be found at UMich and Sumex software archives.
***Begin Note***
Many TCP/IP-based applications don't like to have the connection closed yanked out from under them, even if you're not sending or receiving data. Quit those applications when you're done with them, then disconnect. You'll become familiar after a time with which applications behave well and which lash out; you'll know because your SLIP connection will be dropped due to a noisy phone line or somesuch and your TCP/IP-based applications will be open.
***End Note***
(f)Configuring MacPPP
MacPPP is quite popular because of its simple initial configuration; there are far less things to set than in InterSLIP.
[Image
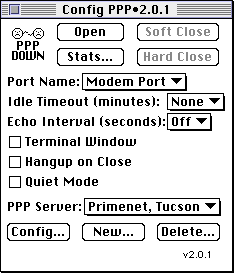
This becomes evident when you open the MacPPP Control Panel (figure 5.44).
[Image
The Port Name pop-up menu should be set to indicate where you've attached the modem. This can be the Modem Port (the most common choice), the Printer Port, an Internal Modem, the Printer-Modem port (if you have a PowerBook 5xx), or the Upper or Lower Card Slot on Macintoshes that have PCMCIA capability.
[Image
The Idle Timeout pop-up menu specifies after how much idle time (no activity on your part) MacPPP will automatically close your connection. (It will warn you, and give you a choice to postpone closing, unless you've turned on the Quiet Mode checkbox.) Some TCP-based applications don't like to have their connection cut off, even if they're idle. They may crash, or cause your Macintosh to be rebooted. If you have MacPPP automatically closing your connection, save your work early and often. That's why I set my Idle Timeout to None; I don't need to look out for more troubles.
[Image
The Echo Interval pop-up menu specifies how often MacPPP should query the connection. If it receives no response to three successive queries it considers the connection dropped, and will ask you whether you want to Close PPP, Ignore, or Restart (PPP). I don't have any problems with my connection dropping, so I leave Echo Internal set to Off.
[Image
The Terminal Window checkbox controls whether MacPPP will do the work of connecting (the default) or whether you'll perform each step (something you'll want to do when you're debugging a connection that doesn't seem to work, and you want to figure out why). You'll start with specifying a phone number to dial ("ATDT555-1212"), move on to typing the user name and password, and finally closing the terminal window (with the OK button) when you see PPP gibberish - the sign of a successful PPP connection.
The Hangup on Close checkbox controls whether two Hayes commands will be sent to your modem to really hang it up. The commands are the "+++" escape string (to get your modem's attention) and "ATH" to hang up the modem. None of the modems I've ever used needed this, but it's there in case yours does.
The Quiet Mode checkbox controls whether MacPPP will request your confirmation of certain actions, such as an idle timeout closing of your connection. Because I want to know exactly what my connection software is doing at all times, I don't use Quiet Mode.
[Image
The PPP Server pop-up menu shows the configurations you (or your network administrator) have set up.
MacPPP
Since you're just now configuring MacPPP, select the New button to bring up the configuration window (figure 5.50).
[Image
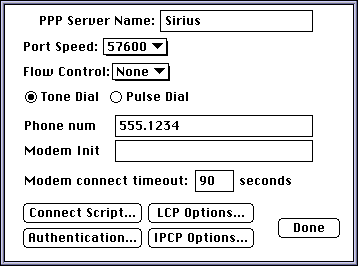
The PPP Server Name shows the name you've given to this configuration.
[Image
The Port Speed pop-up menu controls at what speed your Macintosh and modem communicate, not at what speed your modem talks to the outside world. All my 14.4 kbps and 28.8 kbps modems have worked at 57600 bps; your mileage may vary. Set it to the highest speed that works.
[Image
The Flow Control pop-up menu controls how information coming and going (known as "traffic" in the telecommunications trade) is controlled. Try using CTS & RTS (DTR) first. If you notice your phone connection intermittently disconnecting, especially when you're receiving large amounts of incoming data, try using CTS only. (In case anyone asks, all three options in the pop-up menu are types of hardware flow control. SLIP and PPP can't use software flow control, also known as XON/XOFF.)
[Image
Select the appropriate type of dialing. Most common in the USA is tone dialing.
[Image
The phone number should have been given to you and is hopefully part of your Table 5.2 crib sheet.
The modem initialization string can often be left blank. AT&F will usually set your modem to the factory-default settings. Your modem manual will have a comprehensive (if bewildering) list of all the settings your particular modem supports. For most folks, the sticking points (if any) are turning hardware handshaking on and software handshaking (also known as XON/XOFF) off.
[Image
The modem connect timeout value controls how long MacPPP will wait for your modem and your provider's modem to negotiate a connection. If, for some reason, it takes an inordinately long time, you'll have to increase this value (although I've actually never seen a negotiation session last more than 90 seconds).
[Image
Lastly, at the bottom of the configure server dialog window, are the four horsemen of the apocalypse. Whoops. That'd be the four configuration buttons of MacPPP.
[Image
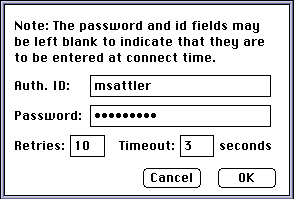
I'll start with the most commonly-used button, Authentication. Most likely your provider's PPP server will use the Password Authentication Protocol (PAP) to authenticate your identity. PAP is the reason for PPP's great popularity - it does all the dirty work. PAP requires that you provide your username and password. You do this by clicking the Authenticate button, waiting for the authentication dialog window (figure 5.59) to appear, and typing your username in the Auth. ID field and your password in the Password field.
[Image
The Retries value controls how many times MacPPP will dial your provider if the line is busy. The Timeout value controls how long PAP has to work; three seconds - the default - has always worked for me.
[Image
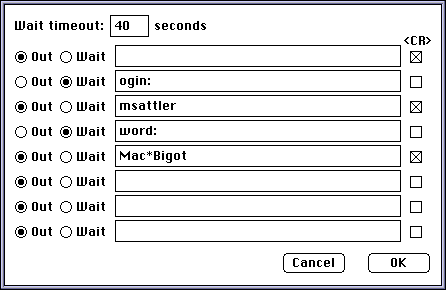
If your provider's PPP server doesn't support the Password Authentication Protocol, you'll have to provide a script that describes your provider's back-and-forth authentication negotiation. The Connect Script button brings up the connect script window (figure 5.61), where you see a typical connection script.
[Image
Each script line has three controls: radio buttons that controls who's "speaking" the line, a text field that contains what's being said, and a checkbox for sending a carriage-return after an output line (almost always necessary). The script you see in figure 5.X does this:
1. Send a carriage return upon connection. (The Out radio button is selected, there's no text provided, and the is checked.)
2. You wait for your provider's computer to respond with a string that contains "ogin:" - it may be "Login" or "login", since we don't know which we specify the part we do know.
3. Send your username and a carriage return to your provider's computer.
4. Wait for a response that contains "word:" - it might be "Password:" or "password:", we don't know.
5. Send your password and a carriage return. (Yes, your password is stored in plain view of anyone who knows how to find it. This is a weakness of MacPPP that you'll have to be aware of if your Mac is used in a shared setting, such as a school laboratory, or where others can get at it.)
[Image
[Image
The LCP Options and the IPCP Options buttons are gateways to configuration windows that are the provence of your network administrator. The vast majority of users will never have to change any of those settings.
When you're finished configuring the PPP server, click the Done botton.
[Image
Now you're back at the main MacPPP control panel window. There are two ways of initiating a PPP connection: using the Open button or starting an application that wants to speak TCP/IP (which will cause an automatic connection to be started). While it seems to me that MacPPP's automatic connection ability is slightly more robust than InterSLIP's, it doesn't give me a warm and fuzzy feeling. I wish I could turn it off for good, but that's not possible. The Hard Close button is supposed to do that, but I've found that MacPPP still dials up my provider when a TCP/IP-based application has something to say (or some other spurious event makes MacPPP think it's time to reach out and dial someone).
The Soft Close button disconnects your PPP connection, but allows MacPPP to reestablish it if necessary (which it seems to do regardless of what I do).
The Stats button brings up a window containing connection statistics, something you'll do at the request of your network administrator (if you're reporting a problem making or sustaining a PPP connection).
Users of Apple's Control Strip or Mice and Men's Desktop Strip can use Richard Buckle's Control PPP Control Strip Module to connect and disconnect without opening InterSLIP Setup at all. Desktop Strip and Control PPP CSM may be found at UMich and Sumex software archives.
***Begin Note***
Many TCP/IP-based applications don't like to have the connection closed yanked out from under them, even if you're not sending or receiving data. Quit those applications when you're done with them, then close the connection. You'll become familiar after a time with which applications behave well and which lash out; you'll know because your PPP connection will be dropped due to a noisy phone line or somesuch and your TCP/IP-based applications will be open.
***End Note***
Windows
Editor: because of the multitude of Windows "standards" and an almost complete lack of agreement as to a common connection method, I'm still hashing this section out with the Windows CU-SeeMe users. I apologize for submitting this chapter to you without this information.
???Author: Please take care of this as soon as possible. As I stated in the last chapter, we really need equal or preferably more coverage of Windows because it is the larger market. -dean
|
| Have you found errors nontrivial or marginal, factual, analytical and illogical, arithmetical, temporal, or even typographical? Please let me know; drop me email. Thanks! |