|
|
 subscribe
|
subscribe
|

User's Guide |
. . . . . . . . . . . . . . . . . . . . . . . . . . . . . . . . . . . . . . . . . . |
CU-SeeMe User's Guide
The original ad-hoc CU-SeeMe User's Guide which I created appears below. The updated version, the one which appeared in my book, Internet TV with CU-SeeMe, appears here here. I have no idea why anyone would ever want the uber-obsolete version, but I leave it here for the time being.
[This is seriously behind the current version.]
This User's Guide was a long time in gestation. Jher and I had been speaking about the lack of a visual guide to CU-SeeMe for some time before I created these web pages, at which point the deficiency became too glaring. Jher provided the first generation of explanatory text as well as the following wonderful snapshots of an unwitting victim (a "very cool person in New York").
This page demonstrates the operation of CU-SeeMe for the Macintosh, circa version 0.7. It's not intended to replace the READ-ME file that accompanies the software distribution.
Here's a pseudo-table-of-contents:
When CU-SeeMe starts up, you'll be presented with a Local Video window that looks something like the following. The identification name you've specified appears in the menubar. If you are able to transmit (camera attached and 'vdig' video digitizer recognized) you'll see a image. Four control buttons appear below the image, and below that is a status line.
The flip-image button
The status line toggle button
The freeze-video button
The options area toggle button
Once you've used the options area toggle button
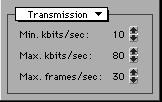
The CU-SeeMe Transmission Options allow you to change (from top to bottom) the minimum kbps you send, the maximum kbps you send, and the maximum number of frames per second you send. It's customary to send no more than 80 kbps; many reflectors will automatically disconnect you and prevent you from reconnecting for ten minutes if you violate this good-manners boundary.
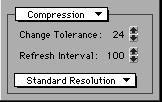
The CU-SeeMe Compression Options allows you to change the video tolerance, refresh interval, and transmission resolution. Only the latter is normally changed, and then only for point-to-point connections. High resolution sends four times as many bits out as standard resolution, and consequently eats up bandwidth like gang-busters.
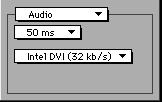
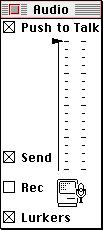
The CU-SeeMe Audio Options allows you to select a transmission method and speed. Depending upon your connection method (direct Ethernet, modem) you'll find that only some audio options are serviceable.
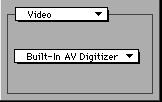
The CU-SeeMe Video Options allows you to select a 'vdig' video digitizer resource for CU-SeeMe to use to access your camera hardware. Users of the Connectix QuickCam will see "Connectix QuickCam", Macintosh A/V users will see "Built-In AV Digitizer", and users of other hardware and software combinations should see yet other options.
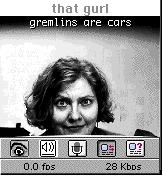
This is how another CU-SeeMe user (that's transmitting) will appear to you. The name they've chosen appears in the title bar, a video image appears as they've adjusted it to appear (using the same controls we've just finished discussing), a set of buttons is below the image area, and a status bar is below that.
The video-state button
The audio button
The microphone button
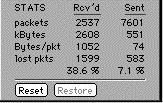
Sometimes, you'll see a status bar
The Transmission Statistics button
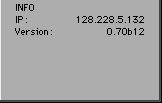
The Version/IP button
In addition to video and (where applicable) audio, CU-SeeMe users can also type at each other. Type alphanumeric characters at your audience. The backspace key deletes the last character. Clear the entire text with the Enter key. Text appears at the bottom of the video area. Move it to the top with the Up-Arrow key and back to the bottom with the Down-Arrow key. Make your text scroll with the Left-Arrow key, stop it with the Right-Arrow key.
To be added.
|
| Questions about CU-SeeMe? |  |
Ask the readers of the CU-SeeMe Mailing Lists. |
| Have you found errors nontrivial or marginal, factual, analytical and illogical, arithmetical, temporal, or even typographical? Please let me know; drop me email. Thanks! |